


![图片[1]-小米万兆路由器BE10000 RC01刷机教程uboot版+恢复原厂-勇爱设计Netwrok](https://www.getpicion.com/wp-content/uploads/2026/07/image-26-1024x277.png)
第一步的原厂备份文件(部分通用)通过网盘分享的文件:xiaomi-be10000-backups.rar
链接: https://pan.baidu.com/s/1RKB1JUyypzgExdh4xg7A_A 提取码: 8kuv
| 项目 | 规格参数 |
|---|---|
| 产品型号 | 小米万兆路由器 BE10000 |
| 处理器 | 高通 IPQ9570,四核 Cortex-A73 @ 2.2GHz + 双核 NPU @ 1.7GHz |
| 内存 / 闪存 | 2GB DDR4 / 256MB |
| 无线标准 | Wi-Fi 7(IEEE 802.11be),向下兼容 Wi-Fi 6/5/4 |
| 频段架构 | 三频(2.4GHz + 5.2GHz + 5.8GHz) |
| 2.4GHz 速率 | 4×4 MU-MIMO,最高 1376.4 Mbps |
| 5.2GHz 速率 | 4×4 MU-MIMO,最高 5764.8 Mbps |
| 5.8GHz 速率 | 4×4 MU-MIMO,最高 2882.4 Mbps |
| 无线总速率 | 约 10024 Mbps(万兆级) |
| 天线配置 | 12 根高增益天线 + 12 路高功率信号放大器 |
| 万兆网口 | 2× 10G 网口(WAN/LAN 自由切换,SFP+ 支持 10G 光 / 电模块) |
| 2.5G 网口 | 4× 2.5G 网口(WAN/LAN 自适应) |
| USB 接口 | 1× USB 3.0 |
| 最大接入设备 | 1000+ 台设备稳定接入 |
| 特色功能 | 4K QAM 调制、NFC 碰碰连、三频合一、主动散热、米家智能联动 |
![图片[2]-小米万兆路由器BE10000 RC01刷机教程uboot版+恢复原厂-勇爱设计Netwrok](https://www.getpicion.com/wp-content/uploads/2026/07/image-44-1024x628.png)
mobaxterm下载安装教程
login as: root
root@192.168.31.1's password:
┌──────────────────────────────────────────────────────────────────────┐
│ ? MobaXterm Personal Edition v25.3 ? │
│ (SSH client, X server and network tools) │
│ │
│ ? SSH session to root@192.168.31.1 │
│ ? Direct SSH : ? │
│ ? SSH compression : ? (disabled or not supported by server) │
│ ? SSH-browser : ? │
│ ? X11-forwarding : ? (remote display is forwarded through SSH) │
│ │
│ ? For more info, ctrl+click on help or visit our website. │
└──────────────────────────────────────────────────────────────────────┘
sh: /usr/bin/xauth: not found
BusyBox v1.25.1 (2022-12-28 13:34:11 UTC) built-in shell (ash)
-----------------------------------------------------
Welcome to XiaoQiang!
-----------------------------------------------------
$$$$$$\ $$$$$$$\ $$$$$$$$\ $$\ $$\ $$$$$$\ $$\ $$\
$$ __$$\ $$ __$$\ $$ _____| $$ | $$ | $$ __$$\ $$ | $$ |
$$ / $$ |$$ | $$ |$$ | $$ | $$ | $$ / $$ |$$ |$$ /
$$$$$$$$ |$$$$$$$ |$$$$$\ $$ | $$ | $$ | $$ |$$$$$ /
$$ __$$ |$$ __$$< $$ __| $$ | $$ | $$ | $$ |$$ $$<
$$ | $$ |$$ | $$ |$$ | $$ | $$ | $$ | $$ |$$ |\$$\
$$ | $$ |$$ | $$ |$$$$$$$$\ $$$$$$$$$ | $$$$$$ |$$ | \$$\
\__| \__|\__| \__|\________| \_________/ \______/ \__| \__|
root@XiaoQiang:~# md5sum /tmp/mibib.bin /tmp/uboot.bin
3a388fe3646be7dda8c6d3f7ada5767b /tmp/mibib.bin
119255dbcce815b4a67fdcc0d98ba800 /tmp/uboot.bin
root@XiaoQiang:~# mtd write /tmp/mibib.bin /dev/mtd2
Unlocking /dev/mtd2 ...
Writing from /tmp/mibib.bin to /dev/mtd2 ...
root@XiaoQiang:~# mtd write /tmp/uboot.bin /dev/mtd18
Unlocking /dev/mtd18 ...
Writing from /tmp/uboot.bin to /dev/mtd18 ...
root@XiaoQiang:~# mtd verify /tmp/mibib.bin /dev/mtd2 /tmp/uboot.bin /dev/mtd18
Usage: mtd [<options> ...] <command> [<arguments> ...] <device>[:<device>...]
The device is in the format of mtdX (eg: mtd4) or its label.
mtd recognizes these commands:
unlock unlock the device
refresh refresh mtd partition
erase erase all data on device
verify <imagefile>|- verify <imagefile> (use - for stdin) to device
write <imagefile>|- write <imagefile> (use - for stdin) to device
jffs2write <file> append <file> to the jffs2 partition on the device
Following options are available:
-q quiet mode (once: no [w] on writing,
twice: no status messages)
-n write without first erasing the blocks
-r reboot after successful command
-f force write without trx checks
-e <device> erase <device> before executing the command
-d <name> directory for jffs2write, defaults to "tmp"
-j <name> integrate <file> into jffs2 data when writing an image
-s <number> skip the first n bytes when appending data to the jffs2 partiton, defaults to "0"
-p <number> write beginning at partition offset
-l <length> the length of data that we want to dump
Example: To write linux.trx to mtd4 labeled as linux and reboot afterwards
mtd -r write linux.trx linux
root@XiaoQiang:~#
root@XiaoQiang:~# mtd verify /tmp/mibib.bin /dev/mtd2
Verifying /dev/mtd2 against /tmp/mibib.bin ...
e38f383adde76b64f7d3c6a87b76a5ad - /dev/mtd2
e38f383adde76b64f7d3c6a87b76a5ad - /tmp/mibib.bin
Success
root@XiaoQiang:~# mtd verify /tmp/uboot.bin /dev/mtd18
Verifying /dev/mtd18 against /tmp/uboot.bin ...
db559211b415e8ccc0dc7fa600a88bd9 - /dev/mtd18
db559211b415e8ccc0dc7fa600a88bd9 - /tmp/uboot.bin
Success
root@XiaoQiang:~# cat /proc/mtd
dev: size erasesize name
mtd0: 00180000 00020000 "0:SBL1"
mtd1: 00180000 00020000 "0:SBL1_1"
mtd2: 00100000 00020000 "0:MIBIB"
mtd3: 00080000 00020000 "0:BOOTCONFIG"
mtd4: 00080000 00020000 "0:BOOTCONFIG1"
mtd5: 00380000 00020000 "0:QSEE"
mtd6: 00380000 00020000 "0:QSEE_1"
mtd7: 00080000 00020000 "0:DEVCFG"
mtd8: 00080000 00020000 "0:DEVCFG_1"
mtd9: 00080000 00020000 "0:APDP"
mtd10: 00080000 00020000 "0:APDP_1"
mtd11: 00080000 00020000 "0:TME"
mtd12: 00080000 00020000 "0:TME_1"
mtd13: 00080000 00020000 "0:RPM"
mtd14: 00080000 00020000 "0:RPM_1"
mtd15: 00080000 00020000 "0:CDT"
mtd16: 00080000 00020000 "0:CDT_1"
mtd17: 00080000 00020000 "0:APPSBLENV"
mtd18: 00180000 00020000 "0:APPSBL"
mtd19: 00180000 00020000 "0:APPSBL_1"
mtd20: 00140000 00020000 "0:ART"
mtd21: 00100000 00020000 "0:ETHPHYFW"
mtd22: 00080000 00020000 "0:TRAINING"
mtd23: 00040000 00020000 "0:LICENSE"
mtd24: 03c00000 00020000 "rootfs"
mtd25: 03c00000 00020000 "rootfs_1"
mtd26: 00040000 00020000 "bdata"
mtd27: 00040000 00020000 "crash"
mtd28: 00040000 00020000 "crash_syslog"
mtd29: 04600000 00020000 "overlay"
mtd30: 004f8948 0001f000 "kernel"
mtd31: 01d4e000 0001f000 "ubi_rootfs"
mtd32: 00706000 0001f000 "cfg"
mtd33: 0160a000 0001f000 "user"
mtd34: 0216c000 0001f000 "plugin"
root@XiaoQiang:~#
第一步:解锁SSH权限(关键!必做)
- 网线连接:电脑插路由器LAN口。1,2,3口。IP设为自动获取。
- 系统版本适配:后台查版本。需手动升级开发版固件。后台直接升级提示失败的。跟着做。打开小米恢复工具,选择开发版固件。选择路由器连接电脑的网卡。点击下一步。等待工具修改网卡。进入这个界面后。按照提示拔掉路由器电源10秒。按住reset键不松手。重新插入电源。全程别松reset键!等10秒看到灯开始闪,再松手。这时候进入恢复流程。过程大概2分钟。恢复完成后,路由灯光闪动。路由器重新插电。可以看到开发版固件升级完成了。
- 解锁操作:关闭杀毒软件。运行工具包的run.bat。按提示输入:
- 输入2回车。如果有密码提示。输入密码12345678解锁。
- 输入4回车。备份原系统;
看到“completed”即完成。关闭窗口。备份文件会存在文件夹里的backup目录。万一出问题能恢复。建议保存好。
![图片[3]-小米万兆路由器BE10000 RC01刷机教程uboot版+恢复原厂-勇爱设计Netwrok](https://www.getpicion.com/wp-content/uploads/2026/07/image-39.png)
![图片[4]-小米万兆路由器BE10000 RC01刷机教程uboot版+恢复原厂-勇爱设计Netwrok](https://www.getpicion.com/wp-content/uploads/2026/07/image-40.png)
第二步:SSH刷入临时文件+uboot
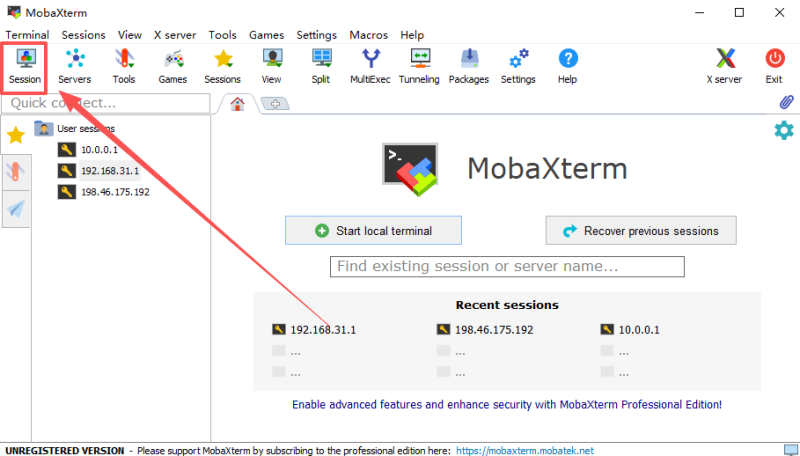
打开mobaxterm。点“新建终端”。输入主机名:192.168.31.1
点“OK”。弹出“窗口提示”就点ACCEPT。输入用户名root,回车。再输入密码root回车。这里密码不会有输入提示。出现弹窗如视频点击。
进入左边的文件管理。把两个uboot文件直接上传到tmp目录里。
继续逐条复制命令粘贴回车。如视频所示。没有报错,说明uboot刷入完成。完成后不要马上断电。等待30秒后才能下一步操作。
![图片[5]-小米万兆路由器BE10000 RC01刷机教程uboot版+恢复原厂-勇爱设计Netwrok](https://www.getpicion.com/wp-content/uploads/2026/07/image-41.png)
第三步:刷入OpenWRT
拔掉路由器电源10秒。按住reset键不松手。重新插电源——全程别松reset键!灯光闪动后灯光长亮状态。打开本地连接。 设置本地ip地址为192.168.1.10等。浏览器输入192.168.1.1就可以进入uboot界面了。选择openwrt最新固件。点击update,稍等片刻就会进入刷机流程。灯光闪动。过程大概两分钟。灯光长亮后。改回自动获取IP。新建网页打开192.168.1.1输入账号root登录。密码为password。恭喜openwrt刷入成功了。如果以后想换固件。系统更新或者重复第三步即可。
![图片[6]-小米万兆路由器BE10000 RC01刷机教程uboot版+恢复原厂-勇爱设计Netwrok](https://www.getpicion.com/wp-content/uploads/2026/07/image-42.png)
多播设置
后悔药:一键恢复原厂系统
拔掉路由器电源10秒。按住reset键不松手。重新插电源——全程别松reset键!灯光闪动后长亮状态。打开本地连接。 设置本地ip地址为192.168.1.10等。浏览器输入192.168.1.1就可以进入uboot界面了。选择备份文件rootfs.bin。点击update,稍等片刻就会进入刷机流程。灯光闪动。过程大概1分钟。灯光长亮后。改回自动获取IP。新建网页打开192.168.31.1。就可以回到原厂系统了,怎么样是不是很简单。
如果想回原厂uboot,可继续跟着操作。打开mobaxterm。点“新建终端”。输入主机名:192.168.31.1
点“OK”。这里弹出连接失败,没有关系。回到教程第一步解锁下SSH。
回到mobaxterm。重新登陆192.168.31.1。输入用户名root回车。再输入密码root回车。这里密码不会有输入提示。
进入左边的文件管理。把第一步备份文件mtd2、mtd18上传到tmp目录里。逐条复制粘贴命令回车。完成后输入reboot重启命令就可以回到原厂uboot了。如果重启无法开机,小米恢复工具恢复下就可以,这里就不演示了。
![图片[7]-小米万兆路由器BE10000 RC01刷机教程uboot版+恢复原厂-勇爱设计Netwrok](https://www.getpicion.com/wp-content/uploads/2026/07/image-43.png)
login as: root
root@192.168.31.1's password:
┌──────────────────────────────────────────────────────────────────────┐
│ ? MobaXterm Personal Edition v25.3 ? │
│ (SSH client, X server and network tools) │
│ │
│ ? SSH session to root@192.168.31.1 │
│ ? Direct SSH : ? │
│ ? SSH compression : ? (disabled or not supported by server) │
│ ? SSH-browser : ? │
│ ? X11-forwarding : ? (remote display is forwarded through SSH) │
│ │
│ ? For more info, ctrl+click on help or visit our website. │
└──────────────────────────────────────────────────────────────────────┘
sh: /usr/bin/xauth: not found
BusyBox v1.25.1 (2022-12-28 13:34:11 UTC) built-in shell (ash)
-----------------------------------------------------
Welcome to XiaoQiang!
-----------------------------------------------------
$$$$$$\ $$$$$$$\ $$$$$$$$\ $$\ $$\ $$$$$$\ $$\ $$\
$$ __$$\ $$ __$$\ $$ _____| $$ | $$ | $$ __$$\ $$ | $$ |
$$ / $$ |$$ | $$ |$$ | $$ | $$ | $$ / $$ |$$ |$$ /
$$$$$$$$ |$$$$$$$ |$$$$$\ $$ | $$ | $$ | $$ |$$$$$ /
$$ __$$ |$$ __$$< $$ __| $$ | $$ | $$ | $$ |$$ $$<
$$ | $$ |$$ | $$ |$$ | $$ | $$ | $$ | $$ |$$ |\$$\
$$ | $$ |$$ | $$ |$$$$$$$$\ $$$$$$$$$ | $$$$$$ |$$ | \$$\
\__| \__|\__| \__|\________| \_________/ \______/ \__| \__|
root@XiaoQiang:~# md5sum /tmp/mtd2_0MIBIB.bin /tmp/mtd18_0APPSBL.bin
dd7bf843f6db6452c86cf9057e6abc85 /tmp/mtd2_0MIBIB.bin
c5ec86c17717f72f188240a6c7fd7ada /tmp/mtd18_0APPSBL.bin
root@XiaoQiang:~# mtd write /tmp/mtd2_0MIBIB.bin /dev/mtd2
Unlocking /dev/mtd2 ...
Writing from /tmp/mtd2_0MIBIB.bin to /dev/mtd2 ...
root@XiaoQiang:~# mtd write /tmp/mtd18_0APPSBL.bin /dev/mtd18
Unlocking /dev/mtd18 ...
Writing from /tmp/mtd18_0APPSBL.bin to /dev/mtd18 ...
root@XiaoQiang:~# mtd verify /tmp/mtd2_0MIBIB.bin /dev/mtd2
Verifying /dev/mtd2 against /tmp/mtd2_0MIBIB.bin ...
43f87bdd5264dbf605f96cc885bc6a7e - /dev/mtd2
43f87bdd5264dbf605f96cc885bc6a7e - /tmp/mtd2_0MIBIB.bin
Success
root@XiaoQiang:~# mtd verify /tmp/mtd18_0APPSBL.bin /dev/mtd18
Verifying /dev/mtd18 against /tmp/mtd18_0APPSBL.bin ...
c186ecc52ff71777a6408218da7afdc7 - /dev/mtd18
c186ecc52ff71777a6408218da7afdc7 - /tmp/mtd18_0APPSBL.bin
Success
root@XiaoQiang:~# reboot
root@XiaoQiang:~#
Remote side unexpectedly closed network connection
─────────────────────────────────────────────────────────────────────────────────────────────────────────────────────────────────────
Session stopped
- Press <Return> to exit tab
- Press R to restart session
- Press S to save terminal output to file


暂无评论内容